The vernier callipers

The vernier scale is a device that is used for gaining an
extra decimal point in the measurement. A diagram is shown in Figure 1. To find the size of the
object being measured you read:
(a) the zero position of the vernier 14.9 and a bit
(b) then
the line on the vernier scale that matches a main scale line as closely as possible in this case line
3
The dimension of the object is then 14.93 units.
Vernier scales of the type found in
most school laboratories are usually used to measure objects up to a few centimetres across and
to an accuracy of +/- 0.1 mm
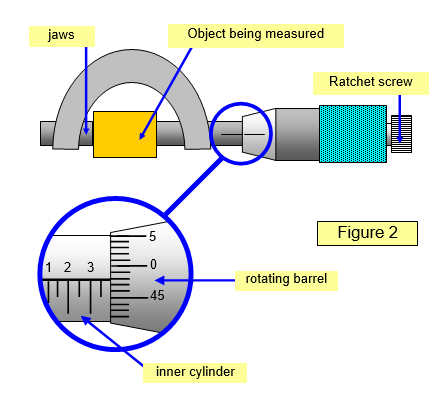
The micrometer screw gauge
If a more accurate measurement is needed a
micrometer screw gauge can be used. This normally has accuracy of 0.01 mm and is used to
measure objects no more than a few millimetres across.
The inner cylinder is graduated in
mm and half mm while the rotating barrel section is graduated from 0 to 50. One turn of this will
advance the jaws by 0.5 mm and so one division on the barrel is equal to 0.01 mm.
The
ratchet screw should always be used when closing the jaws to avoid squashing the object being
measured.

In the example shown in Figure 2 the object is 3.98 mm
wide.
A VERSION IN WORD IS AVAILABLE ON THE SCHOOLPHYSICS USB


